Pages

Showing posts with label DIY. Show all posts

Thursday, June 26, 2014

summer sewing: black floral chiffon kimono

        Style & Co. petite V-neck tee, Macy's
distressed denim mini, Old Navy

        Summer = sewing time around here, and this is the first thing I whipped up. I've been wanting to buy a kimono top for a while, but saw many (albeit with pretty embroidery) going for $50 in stores. That's my entire monthly clothing budget, so I needed an alternative.
       I headed to the fabric store and picked up 2 yards of this rather florid print for $12. A bright print on a black background just says summer nights to me ... although I will admit that most of my summer nights are happily spent sitting on the couch with a book vs. going out. I liked the big print, but going for a straightforward floral was a stretch for me. I tend to lean toward abstract/graphic florals, so I'm still undecided on whether I like the print, although the colors are beautiful.
        This is basically 3 rectangles sewn together - no separate sleeve - which I think accounts for the voluminous fit. I've never sewn with chiffon before, so it was an interesting project - I used French seams for the first time (to enclose the madly fraying raw edges) and hemming the neckline, bottom, and sleeves took up the  bulk of sewing time. This came out a bit longer than expected, and it almost has a cocoon shape - notice how the side seams hang a bit lower than the rest of the hem in the side view below. I think it also has to do with the slouch of a generously cut arm opening.


    Nonetheless, I think this came out OK for my first time working with chiffon, and a longer hem has an unexpected benefit - more styling options! I figured out that I can alter the silhouette by tying the ends in front:
Or tying the ends in the back gives you just a peek of print in the front ...
 
... and an interesting draped effect in the back.
   Now I just need to figure out different ways to wear my kimono ... for its inaugural wearing, I went with the classic white V-neck tee and denim bottoms option, which is what you'll often find when you Google "styling a kimono top." Some other styling options:
  • dark skinnies
  • white jeans
  • tucked into a pencil skirt as a kind of wrap top
  •  And since Suzanne just blogged the versatility of a little black dress, I'm wishing I owned a simple black dress that I could pair up with this kimono ... I don't see many people wearing kimono tops with a dress, maybe because of hemline/proportion issues, but it sounds intriguing.
Do you own a kimono top? If so, how do you style yours (I'm looking for ideas!)

Tuesday, April 29, 2014

one cuff away from Wonder Woman

chambray top, thrifted
DKNY jeans, Macy's
necklace, Haitian Beads

      These pants did not photograph well at all, and this is the best I could do with some tweaking in PicMonkey. Nothing really special about this outfit, except that I'm wearing the silk cuff I made a long time ago! I never wore it on the blog because I figured out the standard metal cuff blank is too big for my wrist - it kept falling off. However, I inadvertently squished the cuff opening smaller because it got stuck under something heavy. Um, yay for disorganization and not putting things away properly?!??
    This silk tie cuff was a pretty easy DIY and a fun way to repurpose a thrifted tie. I'm not quite satisfied with how I hand-stitched one end (the rest was machine-stitched). However, since I bought an entire set of cuff blanks I'm looking forward to perfecting my technique over the summer. I'm actually tempted to sew a matching pair of cuffs and wear them a la Wonder Woman - some days in the classroom call for dressing like a superhero.

Saturday, June 1, 2013

tutorial: subtle glitter dot t-shirt


beach INC linen shorts, Macy's
necklace, New Zealand


MATERIALS:
  • T-shirt
  • black acrylic paint
  • textile medium
  • silver glitter acrylic paint
  • dabber brush (or anything you choose to make dots - could be a pencil, etc)
  • disposable chopsticks (or something to mix with)
  • a toothpick
  • paper plate
  • newspaper

1. Wash and iron your t-shirt.
2. Lay some newspaper out to protect your floor or the surface of your workspace.
3. Lay out your t-shirt on the newspaper. Place sheets of newspaper inside the t-shirt to prevent the paint from leaking through.


4. Mix your acrylic paint and textile medium with the chopstick. My textile medium suggested two parts paint to one part textile medium.

5. Use dabber or tool of choice to dot your shirt. I read here that you can rotate the dabber to make perfectly round dots but I liked the irregular look. I also didn't dip the dabber for each dot, so I got more variety in the darkness of the dots.

 Awesome irregular dots

 Ready for glitter!

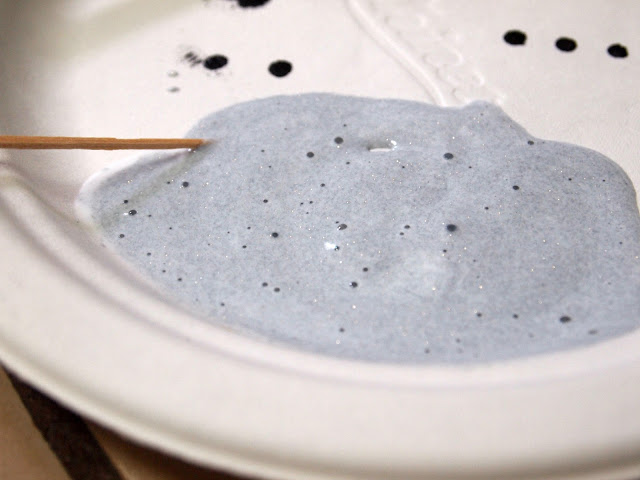
6. Mix glitter acrylic paint and textile medium. Check the bottle or manufacturer's web site for directions - the glitter paint may need to be mixed at a different ratio.


7. Use your toothpick to add glitter highlights to random dots. For some, I colored in the places where the black paint didn't go; for others I did a partial outline. I ended up highlighting the majority of my black dots with the silver glitter, it was so much fun!

       The paint goes on white-ish (shown above), but dries to a glittery silver (below).


8. Hang up your t-shirt and admire it while it dries. Let it dry thoroughly - I let it hang for several days.
9. Heat set your paint, following manufacturer's directions. Setting the paint with a cloth soaked in vinegar is suggested for my brand, but I wasn't keen on vinegar fumes. I went with the dry ironing method instead, using a press cloth. The black paint didn't transfer, but the glitter paint did get tacky and stick to the press cloth here and there.

Note: Even with the textile medium, the paint did make the fabric a little stiff. I've already gotten family requests for their own tees, so I'll see how this one washes and wears and possibly experiment with using paint made specifically for fabric.

Tuesday, August 28, 2012

Try-it-out Tuesday: easy, perfect skirt

     I hit the skirt jackpot while on my mad sewing spree a few weeks ago. This skirt tutorial is so easy and the results are lovely. The darts give this skirt a great shape and there's no messing around with buttons or zippers. I whipped this up on a Friday afternoon and have already worn it several times -- with a camisole to pick up some cheap school supplies at the sweltering-hot office supply warehouse, and a little more dressed up with a black tank for class.

 Green cami, Macy's(?)
wrap skirt, made by me
shell bracelet, gift

    
Crazy afternoon light
 black tank, Macy's
necklace, Nordstrom Rack clearance


Tuesday, August 21, 2012

Try-it-out Tuesday: J. Crew-inspired skirt DIY

        I am an intermittent sewer, to say the least -- it's been years since I dragged out the sewing machine. But during the last week before classes started, I got the itch to make something.
       I thought this cheery umbrella-printed cotton would make a cute skirt, and I decided to use this tutorial, which is inspired by J. Crew's elastic waist flirt skirt. (She also revamped the tutorial to make a lined wool skirt with the same pattern.) It's an elastic-waist skirt with a few lovely differences: the  design cuts down on the poof you get with an elastic waist; there's a little ruffle at the waist, and it has pockets.
EDC by Esprit tee, old
skirt, made by me
broken and randomly re-knotted necklace, Forever 21
Fossil belt, Macy's

      I learned how to sew with printed patterns from Simplicity, Butterick, etc., so it's very strange to me to see people breezily laying out some fabric and just cutting into it. What about unfolding that brown tissue-thin pattern and cutting out your pieces? What about carefully pinning it to the cloth and measuring to make sure the grain arrows match up? Eek. Just cutting into the fabric is even more of an undertaking when you are like me and cannot cut a straight line to save your life. Nonetheless, I washed and ironed my fabric, laid it out neatly on the carpet, and proceeded to follow the tutorial. 
Yellow pockets make me happy :)
     This skirt is definitely a different silhouette than I'm used to, but it's breezy and light and just perfect for summer. When I first put it on I thought it was much too poofy, but in the photos it looks OK. I think the wide brown belt helps, although it eventually slid out of place. Would it be oxymoronic to add belt loops to that comfy elastic waist? 

Wednesday, January 18, 2012

CREATE: seed bead bracelets

    Things I do instead of homework on long weekends:
       I'm looking forward to delving into my seed bead collection and making more of these. I love that they're dainty and sparkly.
     The braided one with the tan cord was supposed to look like this.  However, something happened along the way. My local craft store doesn't stock the recommended Irish waxed linen, so I decided to use the braiding cord I had. The problem was that it was a little tough to get the beads on the cord. However, I rather like the organic (OK, some people would say messy and crooked) result of getting the beads wherever I could.

Monday, October 24, 2011

DIY: dyeing project?

I saw this tee here (click to see some fun pattern mixing!), and thought it was such a great take on one of my big loves: STRIPES.
However, I'm not loving the hefty price tag. I wonder whether this could be a DIY? I've never dyed anything before -- any dye experts out there with some advice on whether this is doable, and tips on how to do it?
P.S.: Found a tutorial here that looks promising.
Another tutorial from Rit here